To extend the life of your pin punch tools, it’s crucial to select the correct size and material for the job, use proper perpendicular alignment with controlled force, implement a proactive maintenance routine including cleaning and dressing the tip, store them correctly to prevent damage, use appropriate lubrication to reduce friction, and perform regular inspections to identify wear before failure. Following these professional practices not only preserves your tools but also enhances safety, precision, and efficiency in any high-stakes environment like mold making or precision machining.
In the world of precision mold manufacturing and tool and die making, every component matters. Pin punches, while seemingly simple, are indispensable for assembling, disassembling, and adjusting complex mold assemblies. A bent or broken punch isn’t just an inconvenience; it can lead to costly downtime, damaged mold components, or even safety hazards. At Xiluomold, we understand that the longevity of your tools is directly linked to the quality of your work and your operational profitability. This comprehensive guide is born from our extensive experience in the field, offering you six expert-level strategies to maximize the lifespan of your essential pin punch tools.
Table of Contents
- 1. Master the Art of Selection: Choose the Right Punch for the Job
- 2. Perfect Your Technique: Proper Alignment and Force Application
- 3. Implement a Proactive Maintenance Routine
- 4. Strategic Storage: Protecting Your Investment
- 5. Don’t Underestimate Lubrication
- 6. Regular Inspection: Your First Line of Defense
- Frequently Asked Questions (FAQ)
- Conclusion: A Commitment to Precision and Longevity
1. Master the Art of Selection: Choose the Right Punch for the Job
The first step in extending tool life happens before you even pick up a hammer. Using the wrong pin punch is the fastest way to destroy both the tool and your workpiece. Careful selection is not just a suggestion; it’s a foundational principle of professional craftsmanship. This involves considering the punch’s size, material, and specific type for the task at hand.
Size Matters: Matching Punch Diameter to Pin Diameter
The golden rule of pin punch use is to always use a punch with a tip diameter that is slightly smaller than the diameter of the pin you intend to move. Using a punch that is too large will cause it to bind in the hole, potentially damaging the workpiece and making pin removal impossible without more drastic measures. Conversely, using a punch that is significantly too small concentrates the force on a tiny area, increasing the risk of punching through a hollow pin, marring the pin’s face, or, most commonly, bending or breaking the punch itself. Always measure both the pin and the punch tip with calipers if you are unsure.
What Material is Best? HSS vs. Tool Steel vs. Brass
Not all punches are created equal. The material of your punch should be chosen based on the hardness of the pin and workpiece. Using a punch that is too hard can fracture, sending dangerous shards flying. Using one that is too soft will result in a mushroomed or bent tip after a single use. Understanding the properties of common punch materials is key to both safety and longevity.
| Material | Characteristics | Best For |
|---|---|---|
| Hardened Tool Steel | The most common type. Good balance of hardness and toughness. Can be brittle if struck improperly. | General-purpose use on standard steel dowel pins and taper pins. |
| High-Speed Steel (HSS) | Offers superior hardness and heat resistance compared to standard tool steel. Less likely to deform under heavy use. | Removing stubborn or hardened pins in demanding industrial environments like mold maintenance. |
| Brass | A softer metal that is non-sparking and non-marring. The punch will deform before the workpiece. | Use on delicate or precision-finished surfaces where preventing any damage to the workpiece is the top priority. |
Understanding Different Punch Types
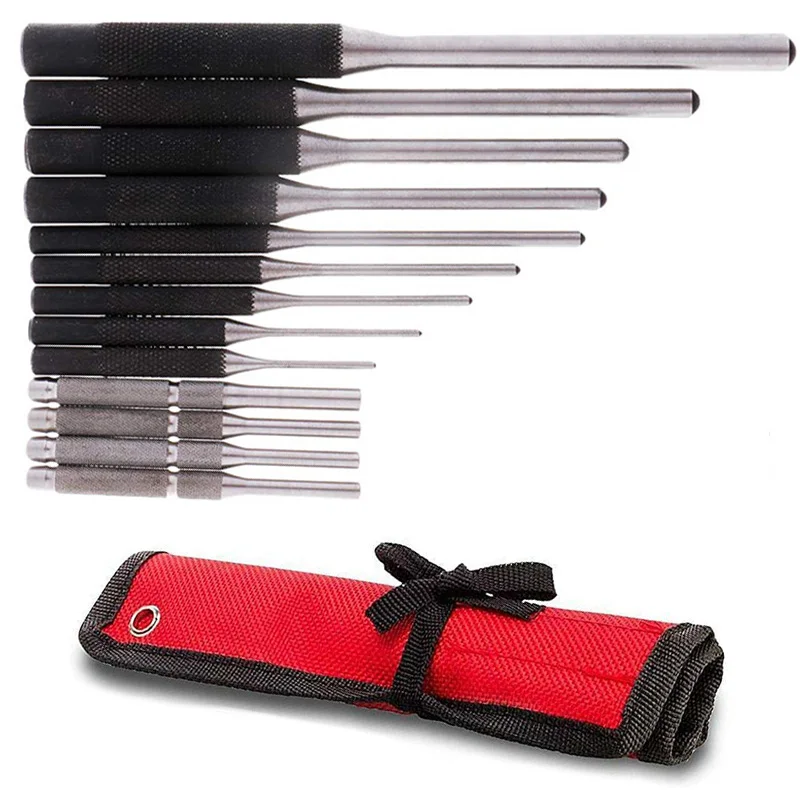
Using the right kind of punch is as important as using the right size. For tightly seated pins, especially taper pins, you should always begin with a starter punch. These are shorter, more robust, and less likely to bend under the initial, high-impact force required to break a pin free. Once the pin is loosened and begins to move, you can switch to a standard, longer pin punch to drive it the rest of the way through the hole. For hollow roll pins or spring pins, a specific roll pin punch with a small, raised ball on the tip is essential. This feature self-centers the punch on the pin’s edge, preventing it from collapsing the hollow pin.
2. Perfect Your Technique: Proper Alignment and Force Application
Even with the perfect tool, poor technique will lead to premature failure. The way you hold the punch and apply force is paramount. Precision and control will always win over brute force, extending the life of your tools and ensuring a professional result.
Why Is Perpendicular Alignment Non-Negotiable?
The single greatest cause of bent pin punches is off-axis striking. The punch must be held perfectly perpendicular (at a 90-degree angle) to the workpiece surface. When the punch is held at an angle, the force from the hammer blow is not transferred directly down the shaft. Instead, it creates a bending moment, putting immense stress on the narrowest part of the tool. This sideways force is what causes the punch to bend or snap. Take a moment to steady your hand and visually confirm your alignment before every strike. This simple check can double the life of your punches.
The “Tap, Tap, Strike” Method: Applying Controlled Force
Resist the urge to swing for the fences on the first hit. A professional approach involves controlled, escalating force. Start with a few light taps to “set” the punch tip securely onto the pin’s face. This ensures the punch won’t slip on the final, more powerful strike. Once set, deliver a firm, confident strike directly to the center of the punch head. Use a hammer that is appropriately sized for the punch; a heavy sledgehammer on a small punch is a recipe for disaster, while a tiny tack hammer on a large starter punch will be ineffective and lead to mushrooming of the punch head.
The Role of a Stable Work Surface
Your workpiece must be supported on a solid, stable surface, such as a heavy-duty workbench, an anvil, or a bench block with a hole to allow the pin to exit. If the workpiece can move or vibrate when struck, much of the hammer’s energy will be absorbed by that movement rather than being transferred to the pin. This ineffective transfer of force tempts the user to strike harder and less accurately, increasing the risk of bending the punch or damaging the part.
3. Implement a Proactive Maintenance Routine
Professional tools are assets that require regular maintenance. A few moments of care after use can prevent corrosion, remove damaging debris, and ensure the tool is safe and effective for its next use. A “use it and toss it” mentality has no place in a precision workshop.
“Dressing” the Tip: How to Safely Regrind a Mushroomed Punch
After repeated hammer strikes, the head of a punch can begin to deform and flatten out, a condition known as mushrooming. A mushroomed head is dangerous because the flattened edges can become brittle and break off during a strike, sending sharp metal fragments flying. To fix this, you must “dress” the head. Using a bench grinder, carefully grind the sides of the head to remove the mushroomed material, restoring a slight chamfer or bevel. Always wear safety glasses during this process. While grinding, dip the punch in water frequently to keep it cool and prevent overheating, which can ruin the tool’s temper and soften the steel.
Cleaning After Every Use to Prevent Corrosion
Your hands transfer moisture and oils onto the tool’s surface, which can lead to rust and corrosion over time, especially in humid environments. After each use, wipe your pin punches down with a clean, dry rag. For long-term storage or in damp workshops, apply a light coat of a rust-preventative oil or a specific tool protectant spray. This simple habit keeps your tools in pristine condition and prevents corrosion that can weaken the steel.
4. Strategic Storage: Protecting Your Investment
How you store your pin punches is a direct reflection of how much you value them. Tossing them into a toolbox drawer with other heavy tools is a guaranteed way to chip tips, cause dings, and bend shafts. Proper storage is about organization and protection.
Why Tossing Them in a Drawer is a Costly Mistake
When punches are loose in a drawer, every opening and closing of that drawer causes them to bang against each other and heavier tools like hammers and wrenches. The hardened, precise tips are the most vulnerable part and can be easily chipped or blunted. A damaged tip will not engage the pin correctly, leading to slippage and potential damage to the workpiece. This careless storage method is a leading cause of premature tool replacement.
The Ideal Storage Solution: Racks, Rolls, and Climate Control
The best storage solutions keep tools separated, organized, and protected. A dedicated punch and chisel stand or rack is an excellent option for a workbench, as it holds each punch vertically and makes selection easy. For portability, a heavy-duty canvas or leather tool roll is ideal. It keeps the punches from contacting each other and can be rolled up compactly. Store these tools in a dry, climate-controlled area to further inhibit rust and corrosion. A well-organized storage system not only protects your tools but also saves you time by making it easy to find the exact size you need.
5. Don’t Underestimate Lubrication
While often overlooked, a small amount of the right lubricant can make a significant difference, especially when dealing with stubborn or dissimilar metals. Lubrication is a low-effort, high-reward step in extending punch life.
Which Lubricant Should You Use?
The choice of lubricant depends on the application. A light machine oil or a general-purpose penetrating oil (like Kroil or PB Blaster) is an excellent choice. These oils help break the static friction (stiction) holding the pin in place. For tighter tolerances or situations where galling is a concern (like with stainless steel pins), a small amount of an anti-seize compound or a tapping fluid can provide a higher level of protection and make removal significantly easier.
How Lubrication Reduces Friction and Prevents Galling
When you strike a punch, you are fighting against the immense friction between the pin and the hole it sits in. A lubricant creates a thin, low-friction film between these surfaces. This means less force is required from your hammer to start the pin moving. By reducing the required impact force, you put less stress on the shaft of the pin punch, dramatically lowering the risk of it bending or breaking. It also helps prevent galling, a form of wear caused by adhesion between sliding surfaces, which can destroy both the pin and the workpiece hole.
6. Regular Inspection: Your First Line of Defense
A tool should never fail by surprise. Regular, vigilant inspection before and after every use is the ultimate proactive measure. It allows you to catch signs of fatigue and wear early, letting you service or retire a tool before it fails catastrophically.
What to Look For: Bends, Cracks, and Mushrooming
Before you use any pin punch, give it a quick visual and tactile inspection.
- Check for Bends: Roll the punch on a flat surface. If you see it wobble or a gap of light appears underneath the shaft, it’s bent and should be retired. Using a bent punch is unsafe and ineffective.
- Inspect for Cracks: Pay close attention to the area where the shaft meets the handle and the very tip. Any visible stress cracks, no matter how small, are a sign of imminent failure.
- Look for Mushrooming: As discussed in maintenance, check the struck end for any flattening or deformation. A mushroomed head needs to be dressed before it can be used safely.
- Examine the Tip: The tip should be flat and crisp. If it is chipped, rounded, or deformed, it will not perform correctly and may damage the pin.
When to Retire a Pin Punch for Safety
A professional knows when a tool has reached the end of its useful life. Do not attempt to straighten a bent punch; the steel has already been compromised and will be significantly weaker. Any punch that is bent, cracked, or has a tip that is damaged beyond repair through grinding must be retired and replaced. The cost of a new pin punch is insignificant compared to the cost of a damaged custom mold component or a potential workplace injury. A culture of safety and quality dictates that compromised tools are removed from service immediately.
Frequently Asked Questions (FAQ)
Why do my pin punches keep bending or breaking?
The most common reasons are using the wrong technique (striking the punch at an angle), using a punch that is too small for the pin, trying to use a long pin punch where a robust starter punch is needed, or using the punch on a pin that is significantly harder than the punch material itself.
Can I use a pin punch as a chisel or pry bar?
Absolutely not. Pin punches are designed to withstand compressive force along their axis. Using them to pry or as a chisel applies a shear or bending force that they are not designed for, which will almost certainly bend or break the tool and can be extremely dangerous.
How often should I inspect my pin punches?
You should perform a quick visual inspection before every single use. This takes only a few seconds and is the best way to ensure the tool is safe and fit for the job. A more thorough inspection, including checking for straightness on a flat surface, should be done periodically or anytime a punch has been used for a particularly stubborn pin.
Conclusion: A Commitment to Precision and Longevity
Extending the life of your pin punch tools goes far beyond saving a few dollars on replacements. It is a direct reflection of a professional’s commitment to quality, safety, and efficiency. By mastering tool selection, perfecting your technique, and adopting rigorous maintenance, storage, and inspection habits, you transform a simple hand tool into a reliable instrument of precision. These practices minimize downtime, protect valuable workpieces, and foster a safer, more productive work environment.
At Xiluomold, we build our reputation on this same principle of precision and durability. We know that the quality of the final product is dependent on the quality of every tool and every process along the way. For industry-leading custom mold manufacturing and precision components that meet the highest standards, trust the experts who value craftsmanship from the ground up. Contact us today to learn how our expertise can benefit your next project.